Healthy Homemade Herb Popcorn

Sometimes the simplest snacks are the most satisfying. Popcorn has been a favorite for generations, but many store-bought microwave and movie theater versions are loaded with butter, sodium, and artificial flavorings that can quickly turn a healthy whole grain into an unhealthy snack. This Healthy Homemade Herb Popcorn is light, crispy, and seasoned with a delicious blend of herbs and spices instead of excess butter and salt. Whether you use a hot air popcorn maker or the stovetop, this wholesome snack is easy to prepare and perfect for movie nights, afternoon cravings, or whenever you’re looking for a crunchy treat that won’t derail your healthy eating goals.

Healthy Homemade Herb Popcorn

Prep Time: 5 minutes

Cook Time: 5 minutes

Total Time: 10 minutes

Servings: 4

Ingredients

  • ½ cup popcorn kernels
  • 1 tablespoon avocado oil or extra-virgin olive oil (optional, for seasoning)
  • 1 teaspoon dried parsley flakes
  • ½ teaspoon garlic powder
  • ½ teaspoon onion powder
  • ½ teaspoon dried oregano
  • ½ teaspoon dried basil
  • ¼ teaspoon smoked paprika
  • ¼ teaspoon sea salt
  • ⅛ teaspoon black pepper
  • 1 tablespoon nutritional yeast (optional, for a naturally cheesy flavor)

Instructions

Option 1: Hot Air Popcorn Maker (Recommended)

  1. Add ½ cup popcorn kernels to your hot air popcorn maker according to the manufacturer’s instructions.
  2. Pop the popcorn into a large serving bowl.
  3. If desired, lightly drizzle the popcorn with 1 tablespoon avocado oil or extra-virgin olive oil. If you prefer an oil-free version, lightly mist the popcorn with avocado oil cooking spray or a small amount of water to help the seasonings stick.
  4. Sprinkle the parsley, garlic powder, onion powder, oregano, basil, smoked paprika, sea salt, black pepper, and nutritional yeast (if using) evenly over the popcorn.
  5. Toss well until every piece is lightly coated.
  6. Serve immediately while warm.

Option 2: Stovetop Method

  1. Heat 1 tablespoon avocado oil in a large pot with a lid over medium heat.
  2. Add 2–3 popcorn kernels. Once they pop, add the remaining popcorn kernels.
  3. Cover the pot with the lid, leaving it slightly ajar so steam can escape.
  4. Shake the pot gently every few seconds while the popcorn pops.
  5. Once the popping slows to about 2–3 seconds between pops, remove the pot from the heat.
  6. Transfer the popcorn to a large serving bowl.
  7. Sprinkle with the parsley, garlic powder, onion powder, oregano, basil, smoked paprika, sea salt, black pepper, and nutritional yeast (if using).
  8. Toss until evenly coated and serve warm.

Nutritional Facts (Approximate Per Serving*)

Nutrient Amount
Calories 145
Protein 4 g
Carbohydrates 18 g
Fiber 4 g
Total Sugars 0 g
Added Sugars 0 g
Fat 7 g
Saturated Fat 1 g
Cholesterol 0 mg
Sodium 160 mg
Potassium 110 mg
Iron 6% DV
Magnesium 10% DV
Zinc 5% DV

*Nutrition values are based on using 1 tablespoon of avocado oil and may vary depending on whether oil or nutritional yeast is used.

Why You’ll Love This Recipe

  • Light, crispy, and packed with savory herb flavor.
  • Made with simple pantry ingredients.
  • A healthier alternative to buttery microwave popcorn.
  • Naturally high in fiber.
  • Whole-grain snack that helps satisfy crunchy cravings.
  • Easy to make using either a hot air popcorn maker or the stovetop.
  • Ready in just 10 minutes.

Women’s Health Benefits

Popcorn is a whole grain that naturally provides fiber, helping support digestive health and promote fullness between meals. Preparing it at home allows you to control the amount of oil and sodium while avoiding many of the additives found in some packaged popcorn products. Herbs like parsley, oregano, basil, garlic, and onion add bold flavor without relying on excess salt. Avocado oil provides heart-healthy monounsaturated fats, and nutritional yeast adds a savory flavor along with B vitamins when included.

Recipe Tips

  • A hot air popcorn maker is the healthiest option because it pops the kernels with little to no oil.
  • Never add oil or seasonings directly into a hot air popcorn maker unless the manufacturer specifically recommends it.
  • If making oil-free popcorn, lightly mist the popcorn with cooking spray or water before adding the seasonings so they stick better.
  • Keep the lid slightly open when using the stovetop method to release steam for crispier popcorn.
  • Toss the popcorn while it’s still warm for even seasoning.
  • Store leftovers in an airtight container for up to 2 days.

Flavor Variations

Garlic Parmesan Herb Popcorn

After popping, sprinkle with:

  • 2 tablespoons grated Parmesan cheese
  • ½ teaspoon garlic powder
  • ½ teaspoon dried parsley

Spicy Herb Popcorn

Add:

  • ¼ teaspoon cayenne pepper
  • ½ teaspoon chili powder
  • Extra smoked paprika

Ranch Herb Popcorn

Mix together:

  • ½ teaspoon dried dill
  • ½ teaspoon dried chives
  • ½ teaspoon garlic powder
  • ¼ teaspoon onion powder

Lemon Herb Popcorn

After seasoning, finish with:

  • ½ teaspoon finely grated lemon zest
  • Extra parsley flakes
  • A light squeeze of fresh lemon juice

Disclaimer: Nutritional values are estimates and may vary depending on the ingredients, brands, and preparation methods used.

Chocolate Chia Pudding

A Rich, Creamy Dessert That’s Packed with Fiber, Healthy Fats, and Chocolate Flavor

If you’re craving something chocolatey but want a healthier option, Chocolate Chia Pudding is the perfect solution. This creamy, no-bake dessert is naturally sweetened, loaded with nutrients, and incredibly simple to prepare. Made with chia seeds, unsweetened cocoa powder, and your favorite milk, it transforms into a smooth, pudding-like treat after just a few hours in the refrigerator.

Chia seeds may be tiny, but they’re nutritional powerhouses. They’re an excellent source of fiber, plant-based omega-3 fatty acids, antioxidants, and important minerals like calcium and magnesium. Combined with cocoa powder, which contains antioxidants called flavonoids, this dessert is as nourishing as it is delicious.

Whether you’re looking for a healthy breakfast, afternoon snack, or guilt-free dessert, this Chocolate Chia Pudding is a satisfying way to enjoy chocolate while fueling your body with wholesome ingredients.

Chocolate Chia Pudding Recipe

Prep Time: 10 minutes
Chill Time: 4 hours (or overnight)
Total Time: 4 hours 10 minutes
Servings: 2

Ingredients

  • ¼ cup chia seeds
  • 1 cup unsweetened almond milk (or milk of choice)
  • 2 tablespoons unsweetened cocoa powder
  • 1 tablespoon pure maple syrup or honey
  • ½ teaspoon vanilla extract
  • Pinch of sea salt

Optional Toppings

  • Fresh strawberries
  • Raspberries
  • Blueberries
  • Sliced banana
  • Unsweetened coconut flakes
  • Dark chocolate shavings
  • Chopped almonds or walnuts
  • Hemp hearts

Instructions

Step 1

In a medium bowl or mason jar, combine:

  • Chia seeds
  • Almond milk
  • Cocoa powder
  • Maple syrup
  • Vanilla extract
  • Sea salt

Step 2

Whisk thoroughly until the cocoa powder is fully incorporated and no clumps remain.

Step 3

Let the mixture sit for 5 minutes, then stir again to prevent the chia seeds from settling at the bottom.

Step 4

Cover and refrigerate for at least 4 hours, or overnight, until thick and pudding-like.

Step 5

Stir well before serving.

Step 6

Top with fresh berries, chopped nuts, coconut flakes, or dark chocolate shavings if desired.

Serve chilled.

Nutrition Facts

Per Serving

Nutrient Amount
Calories 215
Protein 6 g
Carbohydrates 20 g
Fat 13 g
Saturated Fat 2 g
Fiber 11 g
Sugar 8 g
Sodium 140 mg
Potassium 280 mg
Calcium 260 mg
Iron 2.5 mg
Omega-3 Fatty Acids Approximately 2,500 mg

Nutrition values are approximate and will vary depending on the ingredients and toppings used.

Why You’ll Love This Recipe

  • Rich, creamy chocolate flavor
  • No baking required
  • High in fiber to help keep you feeling satisfied
  • Naturally sweetened with maple syrup or honey
  • Rich in plant-based omega-3 fatty acids
  • Great for breakfast, snacks, or dessert
  • Easy to meal prep for the week
  • Naturally gluten-free

Helpful Tips

  • Whisk the mixture twice during the first 10 minutes to create a smoother texture.
  • Refrigerate overnight for the thickest, creamiest pudding.
  • Adjust the sweetness by adding more or less maple syrup to suit your taste.
  • For extra protein, stir in a scoop of chocolate or vanilla protein powder and add a little extra milk if needed.
  • Store covered in the refrigerator for up to 5 days, making it perfect for meal prep.

Frequently Asked Questions

Can I use dairy milk instead of almond milk?

Absolutely. Dairy milk, oat milk, soy milk, coconut milk, or any unsweetened milk alternative works well in this recipe.

Can I make it vegan?

Yes! Simply use maple syrup instead of honey and choose a plant-based milk.

Why didn’t my chia pudding thicken?

The mixture usually needs at least 4 hours to set. Be sure to stir twice during the first few minutes and use fresh chia seeds, as older seeds may not absorb liquid as effectively.

Can I freeze chia pudding?

Yes. Freeze it in airtight containers for up to one month. Thaw overnight in the refrigerator and stir before serving.

Is Chocolate Chia Pudding healthy?

Yes. Chia seeds provide fiber, healthy fats, plant-based protein, calcium, and omega-3 fatty acids, while unsweetened cocoa powder adds antioxidants without excess sugar. This recipe is a nutritious alternative to many traditional chocolate desserts and can easily fit into a balanced eating pattern.

Cottage Cheese & Pineapple Bowl

A Refreshing High-Protein Snack That Keeps You Full and Energized

Sometimes the simplest recipes are the most satisfying. This Cottage Cheese & Pineapple Bowl combines creamy cottage cheese with naturally sweet pineapple for a snack that’s refreshing, nutritious, and incredibly easy to prepare.

Cottage cheese has become a favorite among health-conscious women because it’s packed with high-quality protein, calcium, and other essential nutrients that help support muscle health and keep you feeling fuller for longer. Pineapple adds a burst of tropical sweetness while providing vitamin C, antioxidants, and bromelain, a natural enzyme found in pineapple that plays a role in digestion.

Whether you need a quick breakfast, a mid-afternoon snack, or a light dessert, this delicious bowl comes together in just minutes. With no cooking required, it’s perfect for busy mornings, meal prep, or whenever you’re craving something healthy that still tastes like a treat.

Cottage Cheese & Pineapple Bowl Recipe

Prep Time: 5 minutes
Cook Time: 0 minutes
Total Time: 5 minutes
Servings: 1

Ingredients

  • 1 cup low-fat cottage cheese
  • ¾ cup fresh pineapple chunks
  • 1 tablespoon chopped walnuts or pecans
  • 1 teaspoon chia seeds
  • ½ teaspoon unsweetened shredded coconut (optional)
  • Fresh mint leaves for garnish (optional)

Optional Add-Ins

  • Sliced strawberries
  • Blueberries
  • Kiwi
  • Ground flaxseed
  • Hemp hearts
  • Drizzle of honey (if desired)
  • Sprinkle of cinnamon

Instructions

Step 1

Spoon the cottage cheese into a serving bowl.

Step 2

Top with the fresh pineapple chunks.

Step 3

Sprinkle the chopped walnuts, chia seeds, and shredded coconut over the top.

Step 4

Garnish with fresh mint leaves if desired.

Step 5

Serve immediately and enjoy a refreshing, protein-packed snack.

Nutrition Facts

Per Serving

Nutrient Amount
Calories 275
Protein 28 g
Carbohydrates 19 g
Fat 10 g
Saturated Fat 3 g
Fiber 4 g
Sugar 15 g
Sodium 420 mg
Potassium 470 mg
Calcium 220 mg
Vitamin C 48 mg

Nutrition values are approximate and may vary depending on the ingredients used.

Why You’ll Love This Recipe

  • Ready in just 5 minutes
  • High in protein to help keep you satisfied
  • Naturally sweet with no refined sugar
  • Rich in calcium to support bone health
  • Great for breakfast, snacks, or a light dessert
  • Refreshing and perfect for warm weather
  • Easily customizable with your favorite fruits and toppings

Helpful Tips

  • Choose fresh, ripe pineapple for the sweetest flavor.
  • If using canned pineapple, select fruit packed in 100% juice rather than syrup and drain well.
  • For extra crunch, lightly toast the walnuts before adding them to the bowl.
  • Meal prep by portioning the cottage cheese and toppings separately, then combine just before eating.
  • Keep leftovers refrigerated and enjoy within one day for the freshest taste.

Frequently Asked Questions

Can I use full-fat cottage cheese?

Absolutely. Full-fat cottage cheese creates an even creamier texture and can be a satisfying option depending on your dietary preferences.

Is this recipe good for weight management?

This bowl is rich in protein, which may help increase fullness and support healthy eating habits. It can be part of a balanced eating pattern when enjoyed in appropriate portions.

Can I use frozen pineapple?

Yes. Allow frozen pineapple to thaw slightly before serving so it doesn’t become too icy.

What other fruits pair well with cottage cheese?

Berries, peaches, mango, kiwi, grapes, and melon all pair wonderfully with cottage cheese.

Is Cottage Cheese & Pineapple Bowl healthy?

Yes. This recipe provides a balance of protein, healthy fats, fiber, vitamins, and minerals while using naturally sweet fruit instead of refined sugars. It’s a quick, nourishing option for women looking to enjoy a wholesome snack or light meal.

Healthy Brownie Bites

Rich, Chocolatey, and Made with Better-for-You Ingredients

Sometimes you just need chocolate—but that doesn’t mean you have to reach for a dessert loaded with refined sugar and empty calories. These Healthy Brownie Bites are rich, fudgy, and packed with wholesome ingredients that satisfy your sweet tooth while providing a little extra nutrition.

Made with almond flour, unsweetened cocoa powder, natural sweeteners, and dark chocolate chips, these bite-sized treats are perfect for portion control. They’re ideal as an afternoon pick-me-up, a healthier dessert after dinner, or a grab-and-go snack for busy women.

The best part? They’re incredibly easy to make and come together in under 30 minutes. Whether you’re following a balanced lifestyle or simply looking for healthier dessert options, these brownie bites deliver all the chocolate flavor you crave in a perfectly sized treat.

Healthy Brownie Bites Recipe

Prep Time: 10 minutes
Cook Time: 15 minutes
Total Time: 25 minutes
Servings: 12 brownie bites

Ingredients

  • 1 cup almond flour
  • ¼ cup unsweetened cocoa powder
  • ¼ teaspoon baking powder
  • ¼ teaspoon sea salt
  • 1 large egg
  • ¼ cup pure maple syrup
  • 2 tablespoons melted coconut oil
  • 1 teaspoon vanilla extract
  • ¼ cup dark chocolate chips (70% cacao or higher)
  • Optional: 1 tablespoon dark mini chocolate chips for topping

Instructions

Step 1

Preheat your oven to 350°F (175°C). Lightly grease or line a mini muffin pan.

Step 2

In a medium bowl, whisk together:

  • Almond flour
  • Cocoa powder
  • Baking powder
  • Sea salt

Step 3

In a separate bowl, combine:

  • Egg
  • Maple syrup
  • Melted coconut oil
  • Vanilla extract

Whisk until smooth.

Step 4

Pour the wet ingredients into the dry ingredients and stir until fully combined.

Fold in the dark chocolate chips.

Step 5

Divide the batter evenly among the mini muffin cups, filling each about ¾ full.

If desired, sprinkle a few dark mini chocolate chips on top.

Step 6

Bake for 12–15 minutes, or until the tops are set and a toothpick inserted into the center comes out with a few moist crumbs.

Step 7

Allow the brownie bites to cool for 10 minutes before removing them from the pan.

Serve warm or at room temperature.

Nutrition Facts

Per Brownie Bite

Nutrient Amount
Calories 105
Carbohydrates 8 g
Protein 3 g
Fat 8 g
Saturated Fat 3 g
Fiber 2 g
Sugar 5 g
Sodium 55 mg
Potassium 105 mg
Calcium 35 mg
Iron 1 mg

Nutrition values are approximate and may vary depending on the ingredients used.

Why You’ll Love This Recipe

  • Rich, fudgy chocolate flavor
  • Naturally sweetened with maple syrup
  • Made with almond flour instead of refined flour
  • Bite-sized for easy portion control
  • Ready in just 25 minutes
  • Great for meal prep and lunchboxes
  • Gluten-free when made with certified gluten-free ingredients

Helpful Tips

  • Use high-quality unsweetened cocoa powder for the richest chocolate flavor.
  • For extra protein, mix in a tablespoon of chocolate protein powder and add a splash of milk if needed.
  • Fold in chopped walnuts or pecans for a delicious crunch.
  • Store brownie bites in an airtight container at room temperature for up to 3 days, or refrigerate for up to 1 week.
  • Freeze for up to 3 months. Simply thaw at room temperature before enjoying.

Frequently Asked Questions

Can I make these dairy-free?

Yes! Use dairy-free dark chocolate chips, and the recipe will be completely dairy-free.

Can I use honey instead of maple syrup?

Absolutely. Honey works well as a natural sweetener and creates a slightly richer flavor.

Can I make these without almond flour?

Yes. Oat flour is a great substitute, though the texture may be slightly softer.

Are Healthy Brownie Bites actually healthy?

They’re a healthier alternative to traditional brownies because they’re made with almond flour, natural sweeteners, and dark chocolate while containing less refined sugar and offering more fiber and healthy fats. Like any dessert, they’re best enjoyed as part of a balanced eating pattern.

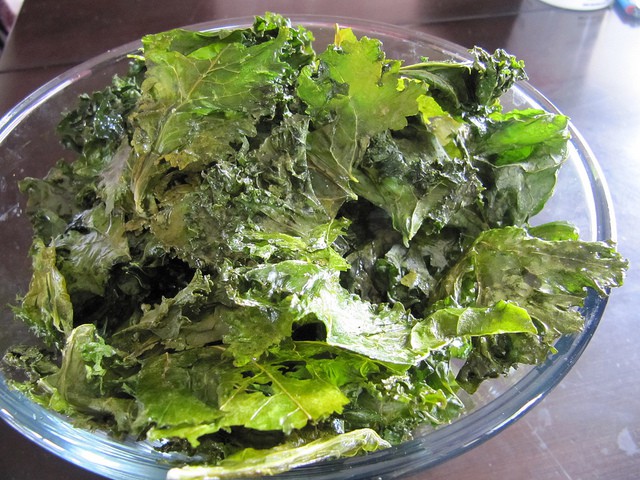
Kale Chips

If you love potato chips and you love healthy foods, then you’ll love this tasty and crunchy snack that is a healthy alternative to fried potato chips. You can buy kale chips in the grocery or health food store or you can make these delicious snacks yourself with your own flavor. Once you make these kale chips, share them with your family and let everyone know about healthy kale chips.

4758885754_26e1bb1df0_z

Ingredients:

12 large leaves of kale (Tuscan kale is known to produce the crispiest chip)
1 Tablespoon olive oil
Seasoned salt to taste

Instructions:

Preheat oven to 250 degrees. Slice the kale leaves in half, lengthwise. Make sure you remove center ribs and stems. Place kale in a medium bowl and toss it with 1 Tablespoon olive oil. Place kale on baking sheet and sprinkle to taste with seasoned salt. Bake the kale for 20 minutes or until kale is crispy.


Photo credit: Kale chips by Jo del Corro

Click here see
Licenses

Healthy Chicken Pinwheels

Yummy, Yummy this delicious snack is not only healthy but it’s easy to make. You can make these snacks for any occasion such as lunch, an on the go snack or for a hors d’oeuvre party. Pinwheels are known for their flavor all wrapped up into one small bite it is a wonderful finger food, but add some vegetables to it and you got yourself something tasty and healthy. The chicken in the recipe adds a kick to the recipe especially when combined with mayonnaise. Chicken is known to help with vitamin b consumption and other assistance for the body. After eating one of these pinwheels be prepared for a satisfied stomach and a health boost to the body.

5045598607_c21140aa60_m
Ingredients:
1 slice of wholegrain bread with the crust removed

1 small lettuce leaf

1 tbs. chopped cooked skinless chicken

1 tbs. chopped carrot or broccoli

1 tbs. mayonnaise

Salt and pepper to taste (optional)

Method:
• Mix the chicken, mayonnaise, salt, pepper and carrots or broccoli together in a small bowl.
• Put the lettuce leaf on the slice of bread
• spread the chicken, vegetable and mayonnaise mixture on top of the lettuce leaf
• At one end of the bread roll the bread up and slice into three or four pieces.

Photo credit: Sun Dried Tomato Hummus, Cucumber, and Yves Veggie Bologna Pinwheels by Janet Hudson

Click here see

Licenses